Print Crystal Report from own button in asp.net c#

12:11:00 AM Mahesh Kumar Yadav 0 Comments


C# code to print crystal report in asp.net from print button

using System; 
using System.Collections.Generic; 
using System.Linq; 
using System.Web; 
using System.Web.UI; 
using System.Web.UI.WebControls; 
using System.Data; 
using SoftHMS.GUI.MISC; 
using SoftHMS.Layer.Business; 

namespace SoftHMS.GUI.Pharmacy.PharmacyReports 
{ 
public partial class breakageReport : System.Web.UI.Page 
{ 
DataSet ds = new DataSet(); 
CrystalDecisions.CrystalReports.Engine.ReportDocument doc = new CrystalDecisions.CrystalReports.Engine.ReportDocument();

protected void Page_Load(object sender, EventArgs e) 
{ 
DateTime TodayDate = DateTime.Now; 
string todaydate = SoftHMS.GUI.NepDate.getNepaliDate(TodayDate).Replace("/", "-"); 
if (!Page.IsPostBack) 
{ 
txtFromDate.Text = todaydate; 
txtTodate.Text = todaydate; 
} 
if (Request.QueryString["act"] == "Print") 
{ 
BreakageBLL obj = new BreakageBLL(); 
string doclocation = Server.MapPath("~/Pharmacy/cryBreakage.rpt"); 
doc.Load(doclocation); 
string fromDate = Request.QueryString["fromdate"].ToString(); 
string toDate = Request.QueryString["todate"].ToString(); 
//obj.FromDate = Convert.ToDateTime(fromDate); 
// obj.ToDate = Convert.ToDateTime(toDate); 
ds = obj.GetBreakageDetailsforReport(); 
doc.SetDataSource(obj.GetBreakageDetailsforReport()); 
BreakageReportViewer.ReportSource = doc; 
doc.SetParameterValue("nepdate", todaydate); 
doc.SetParameterValue("fdate", fromDate); 
doc.SetParameterValue("tdate", toDate); 
BreakageReportViewer.DataBind(); 
} 
} 

protected void Button1_Click(object sender, EventArgs e) 
{ 
string fromDate = txtFromDate.Text; 
string toDate = txtTodate.Text; 
//Response.Redirect("breakageReport.aspx?act=print&fromdate=" +fromDate+ "&todate="+ toDate+""); 
Response.Redirect("breakageReport.aspx?act=Print&fromdate=" +fromDate + "&todate=" + toDate + ""); 
} 
//Print Button
protected void btnPrint_Click(object sender, EventArgs e) 
{ 
try 
{ 
if (ds.Tables.Count < 1) 
{ 
ClientScript.RegisterStartupScript(this.GetType(), "alert", "alert('Report is not generated. Please generate report first to print.')", true); 
// doc.PrintToPrinter(1, true, 0, 0); 
} 

else 
{ 
//Print Code
doc.PrintToPrinter(1, true, 0, 0); 
//ClientScript.RegisterStartupScript(this.GetType(), "alert", "alert('Report is not generated. Please generate report first to print.')", true); 
}
} 
catch (Exception ex) 
{ }
} 
} 
}

0 comments :

How to use Android as a Webcam

4:34:00 PM Mahesh Kumar Yadav 0 Comments


camera to webcam
Requirements:
  • Android Mobile
  • Google or Firefox Browser
Steps to Follow:-
Step 1: Download and install IP webcam for Android and PC.
Step 2: Run App on your android device and change the settings of the device according to your requirements. You could change the video quality, which camera to use, rear and main, username, password, etc.
Step 3: After changing the settings, click on Start Server.
Step 4: An IP address would start showing on the bottom of the App of your android phone.
Step 5: Run IP Webcam application on PC and fill the IP address and Port under Camera Feed URL. Now click on AutoDetect.
Now your device’s Camera is synced with your PC which you can use to replace with your bad quality webcam. 

0 comments :

Method To Accept All Pending Friend Requests At Once

6:33:00 PM Mahesh Kumar Yadav 0 Comments


Facebook is one of the biggest social media platform ever. We make friends on Facebook and do chat, share thoughts and memories through status, images and videos. Facebook is place where not only we make friends but many users play games, many developers, marketer, small business depends on Facebook. Just because Facebook is the easiest way to convey the message to the short period of time. We can easily reach millions of people through pages and groups. If you want to accept all pending friend requests on a single, follow these steps.
  • First of all, click the below-given link and open it into the browser in which you have opened your Facebook account.
https://www.facebook.com/reqs.php
  • After opening above given link in the browser. All Pending request will visible there. 
  • Now Click F12 to open console box or even you can open it by doing right through Inspect Element
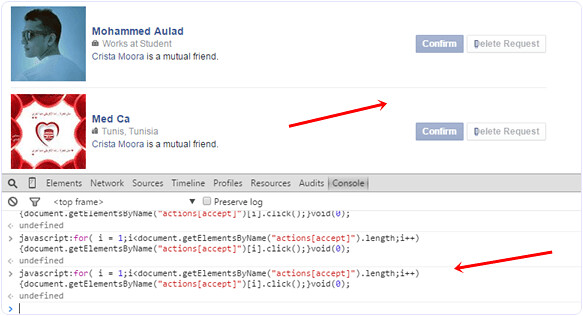
  • Copy below-given code and paste it in the console box. It will look like as shown below.
accept-confirm-all-facebook-friend-request-script

javascript:for( i = 0;i<document.getElementsByName("actions[accept]").length;i++){document.getElementsByName("actions[accept]")[i].click();}void(0);

  • After pasting the above-given code. Press Enter and wait for some time until all pending request will not get confirmed. 
  • Now Scroll down and make sure all request are accepted. In case, their is a See more options then click on it.
  • Again run the same script in the console to accept the request of pending request.
  • accept-confirm-all-facebook-friend-request-script
  • Follow the same process until all the request will not get accepted. 
accept-confirm-all-facebook-friend-request-script-run
I hope you like this trick to accept all pending friends request. If you face any issue or want to suggest regarding this topic must leave your precious comment.

Source: Online

0 comments :

How to show alert box in ASP.NET after data inserted successfully using C#

11:14:00 PM Mahesh Kumar Yadav 0 Comments


Write this line after your insert code:

ClientScript.RegisterStartupScript(this.GetType(), "alert", "alert('Data has been inserted successfully.')", true);

0 comments :

How to find your wireless network password

8:30:00 PM Mahesh Kumar Yadav 0 Comments


Find your password on a Windows PC
If you have a computer running Windows that is connected to your wireless network, you can find the password by doing the following:
Windows 10: Find your password

Step 1:       Go to Start      , and select Settings > Network & Internet.
Step 2:       Select the network you want to connect to, and select Connect.
Step 3:       In the search box, enter view network connections, and in the search results, select View network connections.
Step 4:       In Network Connections, press and hold (or right-click) the network name, and select Status  Wireless Properties.
     Step 5:       Select the Security tab, and select Show characters.
The password for the wireless network is displayed in the Network security key field.
Windows 8.1: Find your password
    Step 1:        Swipe in from the right edge of the screen, and tap Settings.
(If you're using a mouse, point to the lower-right corner of the screen, move the mouse pointer up, and click Settings.)
Step 2:     Tap or click the network icon (      or    ) for the network you want to connect to, and tap or click Connect
Step 3:       Swipe in from the right edge of the screen, and tap or click Search.     
     Step 4:       In the search box, enter view network connections, and in the search results tap or    click View network connections.
Step 5:       In the Network Connections window, press and hold or right-click the network name, and tap or click Status.
Step 6:       Tap or click the Wireless Properties button.
Step 7:       Tap or click the Security tab, and tap or click the Show characters check box.
Step 8:       The password for the wireless network is displayed in the Network security key field.

Windows 8: Find your password
Step 1:       From the Start screen, swipe in from the right edge of the screen, and tap Settings.
(If you're using a mouse, point to the upper-right corner of the screen, move the mouse pointer down, and click Settings.)
Step 2:       Tap or click the wireless network (     )
Step 3:       Tap and hold or right click on a wireless network name, and choose View connection properties.
Step 4:       Select Show characters to see the wireless network password.

Windows 7: Find your password
Step 1:       Click the wireless network icon on the task-bar (lower-right corner).
Step 2:       Right-click your wireless network name, and select Properties.
Step 3:       Select Show characters to see the wireless network password.
Find Wi-Fi password using command
If you are more the type-type type, you will prefer the netsh command anyway. This method allows you to find not only the Wi-Fi password of your current connection but also that of previous connections. The syntax of the command looks like this:
netsh wlan show profile name="ConnectionName" key=clear

Find-WIFI-password-on-the-command-prompt-with-netsh
Finding Wi-Fi password on the command line with netsh
Notice that you only need the quotation marks for the connection name (profile name) when the name contains a blank. You can find the password in the Security settings section next to Key Content.
To get a list of your previous Wi-Fi connections, type this command:

netsh wlan show profiles

Find your password on your router’s configuration webpage
If you have a computer that can connect to the Internet, you can find the password by doing the following:
Step 1:      Open a web browser.
Step 2:      Enter the IP address for your wireless router into the search bar (for example, 192.168.1.1). Look for your router’s default IP address in your router documentation or online.
Step 3:      Enter the user name and password to open your router’s configuration webpage. Most router documentation includes the default user name and password.
Step 4:      On the configuration webpage, look for a wireless or wireless settings option.
Step 5:      Look for a security or wireless encryption setting. The security key (sometimes called a network key, a pass phrase, or a network password) should be listed nearby.

Note
Different router manufacturers have different settings pages. If you can't find the wireless security key, contact the router manufacturer.


0 comments :

Alternate Row Color in Crystal Report

10:08:00 PM Mahesh Kumar Yadav 1 Comments


Most of the time while developing reports people wonder how to have alternating row colours in the report like below.

Customer Name Address City State Zip
Suparba panda 123 olive rd St Louis MO  54678
John Doe 456 Tree drive Raleigh NC 14676
Jane Doe 768 Hudson rd Atlanta GA 76555

There is a trick to it.

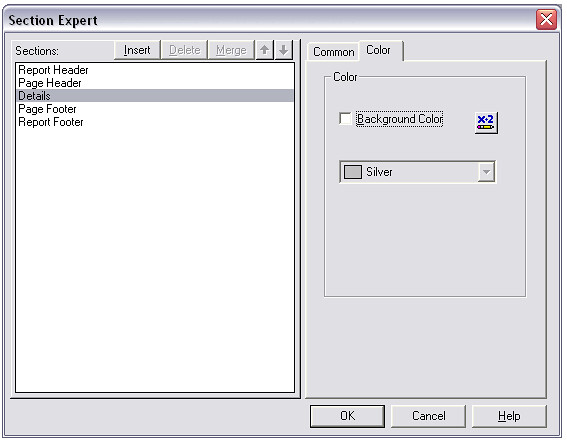
Go to the format section of the Details. Click the Colour Tab. Then click the button next to the Background Colour Check-box..
CR1

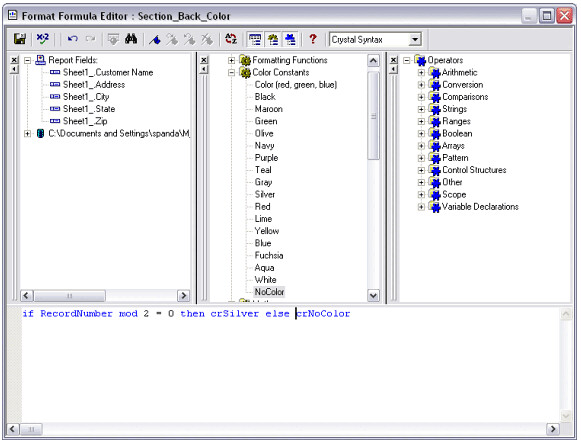
In the formula editor of background colour, type the following:
if RecordNumber mod 2 = 0 then crSilver else crNoColor

CR2

Save and close the editor.
And now when you run the report you will see alternate colours of silver and white in the details section.

1 comments :

How to root Samsung Galaxy Core 2 (SM-G355H)

10:30:00 AM Mahesh Kumar Yadav 7 Comments


samsung_galaxy_core_ii

Detailed steps:
1. Download the file attached in this post and copy it into your external SD card
2. Switch off your phone and boot into recovery by holding Volume Up + Power + Home buttons (Stock recovery is able to flash this file)
3. Navigate by pressing the Volume Up/Down button and choose "Apply update from external storage" by using the Power button.
4. Select the file UPDATE-Kinguser-3.4.0.zip
5. The phone will auto reboot and gives root access
6. To check root access download and install Root Checker from Google Play Store. 

Attached Files     File Type: zip UPDATE-Kinguser-3.4.0.zip 


Source: Internet

7 comments :

Track your lost Android device with Google’s Android Device Manager

2:15:00 AM Mahesh Kumar Yadav 0 Comments


Requirements:
  • Your device is connected with your Google account.
  • Your device has access to the internet.
  • Allowed Android Device Manager (ADM) to locate your device (turned on by default). This can changed in the Google Settings app.
  • Allowed ADM to lock your device and erase its data (turned off by default).
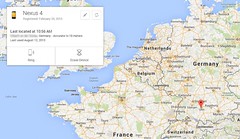
Android Device Manager is a Google’s official and easy-to-use tool to track your Android phone or tablet. The best thing about it is that you don’t need to install an app to be able to track your devices. The only requirement is that your device is connected to your Google account, turned on and connected to the internet. All you need to do is visit the Android Device Manager while being logged into your Google Account. Once the site is loaded it will automatically try to track down your phone. If you have several Android devices registered, make sure the right one is chosen in the dropdown menu.
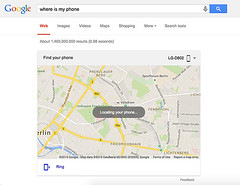
In a recent update, Google implemented some of ADM’s features into their search results page. This means that you’re able to quickly locate any registered Android device right from the search results. By using the search phrase “where is my phone”, Google displays a little map above the search results in which it will try to find your phone. Once found, you can let it ring by clicking on “Ring” at the bottom left.
android-device-manager-search
Although this makes it more convenient to find your phone quickly, it won’t offer you all the options you get with the full version of Android Device Manager.
Using ADM, you are able to track your registered Android devices, let your phone ring and wipe your phone’s data (which has to be enabled manually). Besides that, ADM doesn’t offer more options to remote control your phone. I hope that Google keeps improving it and introduces more helpful features, such as  taking pictures in case it got stolen and you want to take a snapshot of the person who took it.
In case there’s no laptop around when you lose your device, you can also use someone else’s Android phone to track it. Instead of using the mobile browser, you can also use the Android Device Manager app. If you the other phone doesn’t have it, simply download it here. You can sign in using the guest mode and your Google account credentials. Now you should be able to track your lost device, let it ring or wipe its data.
Android-Device-Manager
Are you not able to locate your phone this way? This can happen for several reasons. The one you should hope for, is that your device is simply not connected to the internet or turned off. In that case, simply keep trying to track it until it (hopefully) connects to Google’s services again.
In case it got stolen, it’s possible that the thief has disconnected your device from your Google Account. If that happens, neither Android Device Manager nor any other tracking tool will be able to locate the device, since it’s necessary to be logged into your Google Account. This doesn’t apply to previously installed tracking apps but in this scenario there are none on the phone. However, there’s one last resort but more on that later.
Source: Internet

0 comments :

iRoot Guide – Rooting Guide for Any Android Device

1:28:00 AM Mahesh Kumar Yadav 2 Comments


Android is the most popular smartphone operating systems in the market till now. It offers a variety of apps and settings but, eventually reach their usage and customization limits at a certain point. Rooting your android device (smartphone or tablet) will offer you thousands of tweaks, skins and new apps that you should not miss out.
Root-Your-Device-Rooting-Guide-for-Any-Android-Device
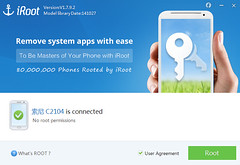
In this Rooting guide, we’ll be using iRoot. iRoot is a rooting software that supports more than 150,000 devices from Android OS 2.2 to 4.4. This number is still growing though.
iRoot is also known as Root Master. It’s a Windows Application that helps you to root your android phone in a single click. Here, u can see ‘How to use iRoot to Root your Android Device?’.
Important points to remember:
  • Your Android Device’s data like contacts, pictures, videos, and music etc won’t be affected with this method.
  • Your Android Device’s warranty may be void after this process.
How to use iRoot? – iRoot Guide [Rooting Guide for any Android Device]
Done!
1. Enable USB Debugging in your phone from Developer options.
(To enable Developer options go to Settings >> About phone >> Tap 5 times on Build Number)
2. If you’ve not installed USB drivers for your device then wait for the device to automatically install them. If it doesn’t, then download them from web.
3. Download and install iRoot.
4. After successful installation, open it.
iRoot
5. Connect your Android device to the computer.
Connect-Device
Once your device is successfully connected to iRoot, it will automatically detect your device.
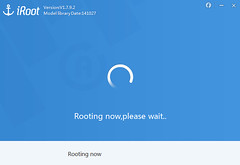
6. Now click on “Root” to start rooting process.
Rooting
WARNING: Don’t touch USB cable while rooting is being done as any interruptions may cause hard-brick (permanent device failure) to your device.
Once successful root, your phone will automatically reboot.
7. Now download and install SuperSU from Google Play store to control root permissions.
That’s all. Your device is now successfully rooted. To check whether your device is successfully rooted or not download Root Checker from Play Store.
Source: Internet

2 comments :

Calling ASP.Net WebMethod using jQuery AJAX

12:48:00 AM Mahesh Kumar Yadav 0 Comments


jQuery allows you to call Server Side ASP.net methods from client side without any PostBack. Actually it is an AJAX call to the server but it allows us to call the method or function defined server side.
Syntax
The following picture describes the syntax of the jQuery AJAX call.
WebMethod using jQuery AJAX
HTML Markup
The following HTML Markup consists of an ASP.Net TextBox and an HTML Button.
<div>
Your Name :
<asp:TextBox ID="txtUserName" runat="server"></asp:TextBox>
<input id="btnGetTime" type="button" value="Show Current Time"
    onclick = "ShowCurrentTime()" />
</div>
Client Side Script
When the Button is clicked the ShowCurrentTime JavaScript function is executed which makes an AJAX call to the GetCurrentTime WebMethod. The value of the TextBox is passed as parameter to the WebMethod.
<script src="http://ajax.googleapis.com/ajax/libs/jquery/1.8.3/jquery.min.js" type="text/javascript"></script>
<script type = "text/javascript">
function ShowCurrentTime() {
    $.ajax({
        type: "POST",
        url: "CS.aspx/GetCurrentTime",
        data: '{name: "' + $("#<%=txtUserName.ClientID%>")[0].value + '" }',
        contentType: "application/json; charset=utf-8",
        dataType: "json",
        success: OnSuccess,
        failure: function(response) {
            alert(response.d);
        }
    });
}
function OnSuccess(response) {
    alert(response.d);
}
</script>
The WebMethod
The following WebMethod returns a greeting message to the user along with the current server time. An important thing to note is that the method is declared as static(C#) and Shared (VB.Net) and is decorated with WebMethod attribute, this is necessary otherwise the method will not be called from client side jQuery AJAX call.
C#
[System.Web.Services.WebMethod]
public static string GetCurrentTime(string name)
{
    return "Hello " + name + Environment.NewLine + "The Current Time is: "
        + DateTime.Now.ToString();
}
VB.Net
<System.Web.Services.WebMethod()> _
Public Shared Function GetCurrentTime(ByVal name As StringAs String
   Return "Hello " & name & Environment.NewLine & "The Current Time is: " & _
            DateTime.Now.ToString()
End Function
Source: Internet

0 comments :