Print Crystal Report from own button in asp.net c#


C# code to print crystal report in asp.net from print button

using System; 
using System.Collections.Generic; 
using System.Linq; 
using System.Web; 
using System.Web.UI; 
using System.Web.UI.WebControls; 
using System.Data; 
using SoftHMS.GUI.MISC; 
using SoftHMS.Layer.Business; 

namespace SoftHMS.GUI.Pharmacy.PharmacyReports 
{ 
public partial class breakageReport : System.Web.UI.Page 
{ 
DataSet ds = new DataSet(); 
CrystalDecisions.CrystalReports.Engine.ReportDocument doc = new CrystalDecisions.CrystalReports.Engine.ReportDocument();

protected void Page_Load(object sender, EventArgs e) 
{ 
DateTime TodayDate = DateTime.Now; 
string todaydate = SoftHMS.GUI.NepDate.getNepaliDate(TodayDate).Replace("/", "-"); 
if (!Page.IsPostBack) 
{ 
txtFromDate.Text = todaydate; 
txtTodate.Text = todaydate; 
} 
if (Request.QueryString["act"] == "Print") 
{ 
BreakageBLL obj = new BreakageBLL(); 
string doclocation = Server.MapPath("~/Pharmacy/cryBreakage.rpt"); 
doc.Load(doclocation); 
string fromDate = Request.QueryString["fromdate"].ToString(); 
string toDate = Request.QueryString["todate"].ToString(); 
//obj.FromDate = Convert.ToDateTime(fromDate); 
// obj.ToDate = Convert.ToDateTime(toDate); 
ds = obj.GetBreakageDetailsforReport(); 
doc.SetDataSource(obj.GetBreakageDetailsforReport()); 
BreakageReportViewer.ReportSource = doc; 
doc.SetParameterValue("nepdate", todaydate); 
doc.SetParameterValue("fdate", fromDate); 
doc.SetParameterValue("tdate", toDate); 
BreakageReportViewer.DataBind(); 
} 
} 

protected void Button1_Click(object sender, EventArgs e) 
{ 
string fromDate = txtFromDate.Text; 
string toDate = txtTodate.Text; 
//Response.Redirect("breakageReport.aspx?act=print&fromdate=" +fromDate+ "&todate="+ toDate+""); 
Response.Redirect("breakageReport.aspx?act=Print&fromdate=" +fromDate + "&todate=" + toDate + ""); 
} 
//Print Button
protected void btnPrint_Click(object sender, EventArgs e) 
{ 
try 
{ 
if (ds.Tables.Count < 1) 
{ 
ClientScript.RegisterStartupScript(this.GetType(), "alert", "alert('Report is not generated. Please generate report first to print.')", true); 
// doc.PrintToPrinter(1, true, 0, 0); 
} 

else 
{ 
//Print Code
doc.PrintToPrinter(1, true, 0, 0); 
//ClientScript.RegisterStartupScript(this.GetType(), "alert", "alert('Report is not generated. Please generate report first to print.')", true); 
}
} 
catch (Exception ex) 
{ }
} 
} 
}

How to use Android as a Webcam


camera to webcam
Requirements:
  • Android Mobile
  • Google or Firefox Browser
Steps to Follow:-
Step 1: Download and install IP webcam for Android and PC.
Step 2: Run App on your android device and change the settings of the device according to your requirements. You could change the video quality, which camera to use, rear and main, username, password, etc.
Step 3: After changing the settings, click on Start Server.
Step 4: An IP address would start showing on the bottom of the App of your android phone.
Step 5: Run IP Webcam application on PC and fill the IP address and Port under Camera Feed URL. Now click on AutoDetect.
Now your device’s Camera is synced with your PC which you can use to replace with your bad quality webcam. 

Method To Accept All Pending Friend Requests At Once


Facebook is one of the biggest social media platform ever. We make friends on Facebook and do chat, share thoughts and memories through status, images and videos. Facebook is place where not only we make friends but many users play games, many developers, marketer, small business depends on Facebook. Just because Facebook is the easiest way to convey the message to the short period of time. We can easily reach millions of people through pages and groups. If you want to accept all pending friend requests on a single, follow these steps.
  • First of all, click the below-given link and open it into the browser in which you have opened your Facebook account.
https://www.facebook.com/reqs.php
  • After opening above given link in the browser. All Pending request will visible there. 
  • Now Click F12 to open console box or even you can open it by doing right through Inspect Element
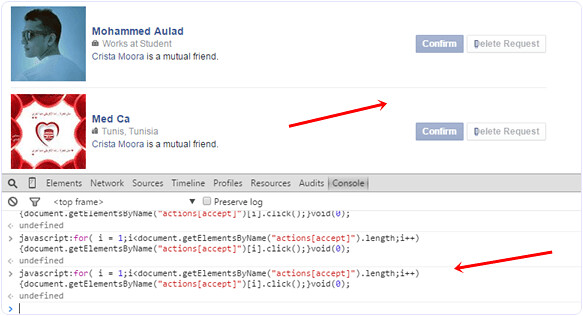
  • Copy below-given code and paste it in the console box. It will look like as shown below.
accept-confirm-all-facebook-friend-request-script

javascript:for( i = 0;i<document.getElementsByName("actions[accept]").length;i++){document.getElementsByName("actions[accept]")[i].click();}void(0);

  • After pasting the above-given code. Press Enter and wait for some time until all pending request will not get confirmed. 
  • Now Scroll down and make sure all request are accepted. In case, their is a See more options then click on it.
  • Again run the same script in the console to accept the request of pending request.
  • accept-confirm-all-facebook-friend-request-script
  • Follow the same process until all the request will not get accepted. 
accept-confirm-all-facebook-friend-request-script-run
I hope you like this trick to accept all pending friends request. If you face any issue or want to suggest regarding this topic must leave your precious comment.

Source: Online

How to show alert box in ASP.NET after data inserted successfully using C#


Write this line after your insert code:

ClientScript.RegisterStartupScript(this.GetType(), "alert", "alert('Data has been inserted successfully.')", true);

How to find your wireless network password


Find your password on a Windows PC
If you have a computer running Windows that is connected to your wireless network, you can find the password by doing the following:
Windows 10: Find your password

Step 1:       Go to Start      , and select Settings > Network & Internet.
Step 2:       Select the network you want to connect to, and select Connect.
Step 3:       In the search box, enter view network connections, and in the search results, select View network connections.
Step 4:       In Network Connections, press and hold (or right-click) the network name, and select Status  Wireless Properties.
     Step 5:       Select the Security tab, and select Show characters.
The password for the wireless network is displayed in the Network security key field.
Windows 8.1: Find your password
    Step 1:        Swipe in from the right edge of the screen, and tap Settings.
(If you're using a mouse, point to the lower-right corner of the screen, move the mouse pointer up, and click Settings.)
Step 2:     Tap or click the network icon (      or    ) for the network you want to connect to, and tap or click Connect
Step 3:       Swipe in from the right edge of the screen, and tap or click Search.     
     Step 4:       In the search box, enter view network connections, and in the search results tap or    click View network connections.
Step 5:       In the Network Connections window, press and hold or right-click the network name, and tap or click Status.
Step 6:       Tap or click the Wireless Properties button.
Step 7:       Tap or click the Security tab, and tap or click the Show characters check box.
Step 8:       The password for the wireless network is displayed in the Network security key field.

Windows 8: Find your password
Step 1:       From the Start screen, swipe in from the right edge of the screen, and tap Settings.
(If you're using a mouse, point to the upper-right corner of the screen, move the mouse pointer down, and click Settings.)
Step 2:       Tap or click the wireless network (     )
Step 3:       Tap and hold or right click on a wireless network name, and choose View connection properties.
Step 4:       Select Show characters to see the wireless network password.

Windows 7: Find your password
Step 1:       Click the wireless network icon on the task-bar (lower-right corner).
Step 2:       Right-click your wireless network name, and select Properties.
Step 3:       Select Show characters to see the wireless network password.
Find Wi-Fi password using command
If you are more the type-type type, you will prefer the netsh command anyway. This method allows you to find not only the Wi-Fi password of your current connection but also that of previous connections. The syntax of the command looks like this:
netsh wlan show profile name="ConnectionName" key=clear

Find-WIFI-password-on-the-command-prompt-with-netsh
Finding Wi-Fi password on the command line with netsh
Notice that you only need the quotation marks for the connection name (profile name) when the name contains a blank. You can find the password in the Security settings section next to Key Content.
To get a list of your previous Wi-Fi connections, type this command:

netsh wlan show profiles

Find your password on your router’s configuration webpage
If you have a computer that can connect to the Internet, you can find the password by doing the following:
Step 1:      Open a web browser.
Step 2:      Enter the IP address for your wireless router into the search bar (for example, 192.168.1.1). Look for your router’s default IP address in your router documentation or online.
Step 3:      Enter the user name and password to open your router’s configuration webpage. Most router documentation includes the default user name and password.
Step 4:      On the configuration webpage, look for a wireless or wireless settings option.
Step 5:      Look for a security or wireless encryption setting. The security key (sometimes called a network key, a pass phrase, or a network password) should be listed nearby.

Note
Different router manufacturers have different settings pages. If you can't find the wireless security key, contact the router manufacturer.